Environment setup
Let's make you able to get your feet wet with JavaScript by setting up your work environment.
Tip
You should read the whole chapter before going ahead and deciding on a setup method.
Depending on how eager you are to get into the action and how comfortable you feel setting up your local machine, you may follow along this book by either:
- coding online, leveraging free and feature-packed JavaScript playgrounds;
- using a local development environment.
First option is the easiest and quickest; second one is more powerful and will probably become necessary as you tackle bigger programming challenges in a not-so-distant future.
Tip
Simply reading along the book is not enough: coding along is mandatory to get a real grasp of how things work and become a capable programmer. So be sure to test every code sample and search every exercise and project!
Prerequisite: a modern browser
Whichever option you may choose for your work environment, you'll need a web browser able to run code written in recent flavors of JavaScript.
The safest bet is to choose either Google Chrome or Mozilla Firefox, two "evergreen" (self-updated) browsers with excellent JavaScript support. Other capable browsers include Opera, Brave and Microsoft Edge. On the contrary, stay away from all versions of Internet Explorer which will have serious issues with ES2016+ code.
Solution 1: coding online
Maybe you're a little bit of the impatient type, or maybe you'd rather not (or haven’t the right privileges to) set up your local machine right now. Fortunately, several online services, often called playgrounds, allow you to type and run JavaScript code directly from your browser. All you'll need in addition is an active Internet connection.
For chapters 1 to 23, you'll need a front-end coding playground able to understand and combine HTML, CSS and JavaScript code. There is a handful of free front-end playgrounds online. Good examples are CodePen, JSFiddle and JS Bin.
About CodePen
If you choose to use CodePen, you really should start by visiting Welcome to CodePen. It introduces the platform in a very friendly way and gives you everything you need to get started.
Starting with chapter 24, a back-end playground will be necessary to create Node.js applications.
What is Node.js?
Node.js (or simply Node) is a platform for running JavaScript code outside the browser. We'll cover this topic in detail in the third part of this book.
A prominent choice for tinkering with Node.js online is Glitch, a platform for quickly building Node-based web applications. Glitch emulates a local Node setup and automates things like code execution, package management, hosting and deployment. You can also remix (clone) any Glitch app to personalize it for your needs. You can learn more about Glitch here and start by remixing this project.
Another valuable option is Replit, an online coding environment with which you can create front-end and back-end applications with JavaScript (among many other platforms). The Replit documentation is a good place to start.
Solution 2: using a local development environment
Setting up your local machine takes a bit of work, but will ultimately give you a tailored and powerful environment. This is also your only choice if you need to work offline.
Install a code editor
At heart, programming is typing code as text in a number of files. To actually program, you'll need to use a code editor on your machine.
The choice is vast here, and you may already have previous experience and personal preferences. A few highlights are Visual Studio Code (used as reference in this book), Brackets, Atom and Sublime Text.
Once you have a code editor installed on your local machine, you can either:
- build your own JavaScript environment;
- start with a ready-made environment specifically crafted for this book.
Let's discuss these two methods.
Solution a: build your own development environment
In this scenario, you'll install and configure each piece of your JavaScript development toolchain manually.
Install Node.js and npm
To set up Node on your local machine, download the latest version here, execute the downloaded file then follow the instructions. The npm package manager is automatically installed along with Node.
Install a code formatter and a linter
Over the years, a lot of tools have been created to ease a JavaScript developer's life. In particular, two kinds of tools are of great interest to any JavaScript professional:
- A code formatter frees you from the burden of formatting your code manually and improves consistency. Prettier is the current standard.
- A linter can greatly improve your code's quality, detecting bugs and enforcing good practices. ESLint is a common choice.
The easiest way to set up these tools is to add them as extensions (sometimes named add-ons) to your code editor. For Visual Studio Code, use the following links for Prettier and ESLint. Follow the instructions provided in their documentation to setup them.
Info
Refer to the style guide for more information about configuring ESLint.
Organize your code
It's important to set up your basic folder and file structure before actually starting to code. That way, your project will be organized, and you'll be starting off with some good programming habits.
You should have a folder in your storage disk dedicated to coding along this book. The folder name doesn’t matter, thejsway-code will do nicely. All local files you subsequently create will be stored in subfolders of this root folder. The most logical solution is to create a subfolder for each chapter of the book.
You can either use a predefined folder structure or follow the next few paragraphs to create this folder structure by hand.
For chapters 1 to 23
In these chapters, you'll execute your JavaScript code through the browser. Your files will be stored according to their type: HTML files (the ones with an .html extension) in an html subfolder, CSS files (.css) in a css subfolder and JavaScript files (.js) in a js subfolder. Each chapter is set up in a series of folders as follows.
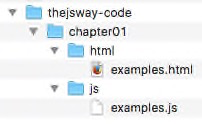
For examples and each exercise of a chapter, create an HTML file in the html subfolder of the chapter folder. In these HTML files, a <script> will load the associated JavaScript code.
<!doctype html>
<html>

<head>
    <meta charset="utf-8">
    <title>Code examples</title>
</head>

<body>
    <!-- If necessary, HTML code goes here -->
    <!-- ... -->

    <!-- Load the JavaScript code located in the examples.js file>
    <script src="../js/examples.js"></script>
</body>

</html>
This <script> tag asks the browser to load the examples.js JavaScript file, located at path ../js/examples.js. The two dots (..) at the beginning of the path indicate you're going back one level in the directory structure relative to the HTML file itself before looking in the js subfolder for a file named examples.js.
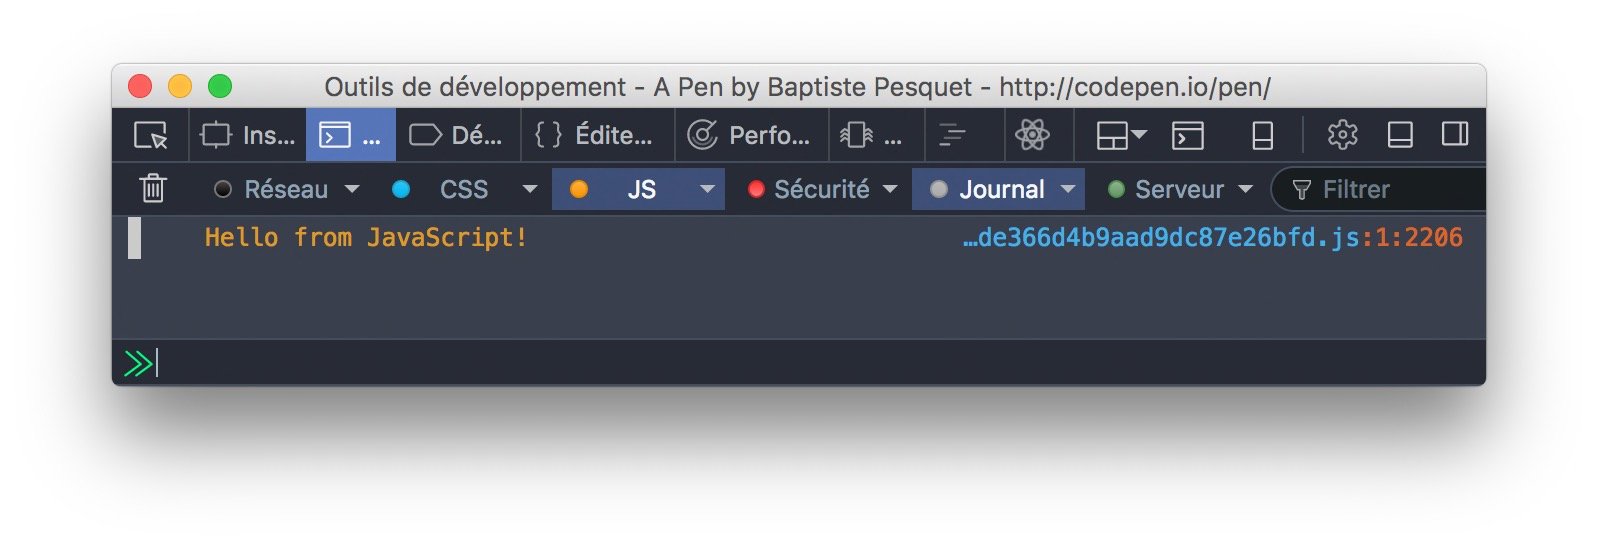
Opening the HTML file in your web browser will trigger the execution of the JavaScript code stored in the .js file. Its result will be shown in the browser console (see below).
From chapter 24 onwards
In these chapters, you'll create Node.js applications to execute your JavaScript code. Each Node app must sit in its own folder and is described by a package.json file located at the root of this folder. Subdirectories may be used to store specific files:
node_modules(automatically created) for external dependencies.publicfor client assets loaded by the browser, like CSS and JavaScript files.viewsfor HTML files.modulesfor internal modules.
Solution b: start with a ready-made environment
Note
The following process is only available with Visual Studio Code.
Rather than installing and configuring every piece of software manually, you can obtain a ready to use, fine-tuned JavaScript environment in a few pretty easy steps. Black magic? No, Docker combined with VS Code.
Docker is a tool for running applications and services in small, lightweight "containers" which do not interfere with your local machine's installed software or configuration. This means you don’t have to worry about configuring or setting up complicated development tools on your local machine. The general idea is given by the following schema. See here for a more detailed overview of Docker.

To use this solution, you need to install and configure Docker Desktop on your local machine.
Next, simply follow this link to kickstart a containerized JavaScript development environment using Visual Studio Code. Clicking it will cause VS Code to automatically install the Dev Containers extension if needed, clone the environment source code into a container volume, and spin up a dev container for you to use.
The newly created container packs everything you need to code alongside this book:
-
A recent version of Node.js;
-
A lightweight web server needed to expose the JavaScript code that lies inside the container;
-
The Prettier and ESLint VS Code extensions, already configured in accordance with the language flavor used throughout the book;
- The predefined folder structure described above, and the initial code for all book exercises.
Pretty neat, isn’t it?
You'll find more information about this solution here.
Use the browser's development tools
In a local development scenario, you'll often interact with your code through your browser's developer tools.
Designed to help with web development, these tools are included in all modern browsers (with minor differences between them). They tools usually include a JavaScript console (to show JS output and optionally type commands), a page inspector (to browse the page structure) and many more!
To discover more about browser developer tools, you might want to check out the following resources: Using the browser developer tools, Optimize your website with DevTools, DevTools Overview (Chrome), DevTools User Docs (Firefox).
TL;DR
-
You have two options for coding along this book: leveraging online services or using a development environment on your local machine.
-
First option is the fastest, second one is more interesting in the long run.
-
Your local machine can be set up for JavaScript coding either by installing everything yourself or exploit a preconfigured, containerized environment.
-
In all cases, testing the code examples and searching the exercises is mandatory for a successful learning!